CLASS III GOLD FOIL
The class III gold foil is
perhaps the most difficult procedure in operative dentistry to master. It has
been used as a gauge of proficiency by many State Boards.
This restoration presents a
number of considerations:
1. To meet the demands of
esthetics, it must be inconspicuous; the outline must, therefore, be in harmony
with the tooth.
2. There must be adequate
access for necessary instrumentation to insert the gold foil.
3. There must be thorough
compaction of all of the gold as it is placed, so convenience form is extremely
important.
4. In securing convenience
form, the important requirement of inconspicuousness of the restoration coupled
with conservation of tooth structure and the logical anticipation of permanence
must ever be kept in mind.
The cavity preparation form
here given is the result of refinements of the basic Class III cavity which was
originally presented by G. V. Black. A number of outlines for typical Class III
preparations have been advocated through the years. This one, refined by W. I.
Ferrier, presents the best to date from the standpoint of esthetics,
convenience, and conservation of tooth structure. This typical preparation
should be learned thoroughly so that the variations from type may be understood
when presented later.
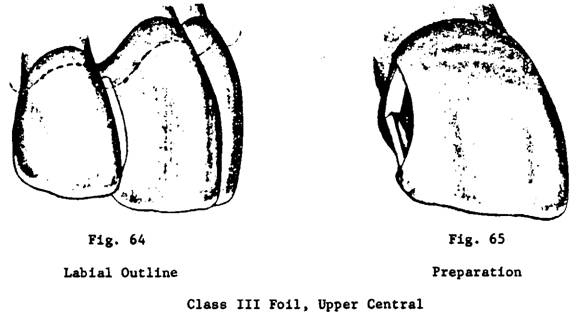
CLASS III FOIL - UPPER CENTRAL – DISTAL
Class III cavity prepared in
upper right central incisor, distal surface, for the reception of gold foil as
the restorative material.
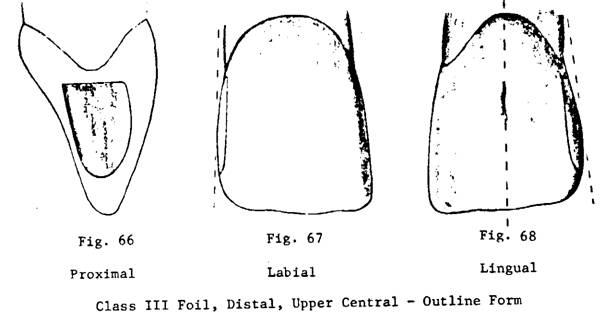
OUTLINE FORM
1. Outline in this cavity
requires consideration of
a.
convenience
b.
esthetics
c. extension for prevention of recurrence of decay.
2. Gingival Wall (Figs. 64,
66)
a.
Is the key to the preparation.
b.
Extended gingivally to a level beneath the margin of
the free gingiva (Fig. 64).
c.
Straight line labio-lingually (Fig. 66).
d.
Approximately at right angles to the long axis of the tooth labio-lingually,
dependent on step b (Fig. 66).
3. Labial Outline (Figs. 64,
65, 67)
a.
Prepared to follow a line in conformity with the contour of the tooth and in conformity
with the approximating tooth (Figs. 64, 67).
b.
When viewed from the labial the gingival 2/3 - 4/5 of the labial outline has
the appearance of a straight line, parallel with the plane of the general
contour of the tooth (Fig. 67).
c. When
viewed diagonally from over the approximating tooth, the labial outline should,
in general, parallel the contour of the line angle of that tooth (Fig. 64).
d. Incisal 1/5 presents a curve that blends in with this line
symmetrically and harmoniously, and connects smoothly with the incisal outline (Figs. 65, 66).
4. Lingual Outline (Figs. 66,
68, 69)
a.
Somewhat different to the labial wall in that convenience is a greater
consideration.
b.
It is governed by position of tooth in the arch and by the shape and position
of the approximating tooth.
c. The
gingival 2/3 of the lingual wall normally is almost parallel with the long axis
of the tooth. More precisely it bisects the angle formed by the plane of the
contour of the proximal surface of the tooth and the long axis (Fig. 68).
d.
The incisal 1/3 meets the incisal
outline in a more definite curve than does the corresponding portion of the
labial outline.
e.
Joins with the gingival wall at a sharp angle, and forms a definite linguo-gingival shoulder (Figs. 66, 68).
5. Incisal
Outline (Figs. 64, 66, 67, 68)
a.
Extended incisally to include and pass the point of
contact with the adjacent tooth so margin of restoration is accessible to
cleansing measures.
b. Joins labial and lingual
outlines in a smooth, regular curve.
RESISTANCE AND RETENTION FORM
Resistance Form
1. Is required to meet the
forces applied during the insertion of the restorative material. Ordinarily
there is no demand for resistance against masticatory
stresses in this class of cavity.
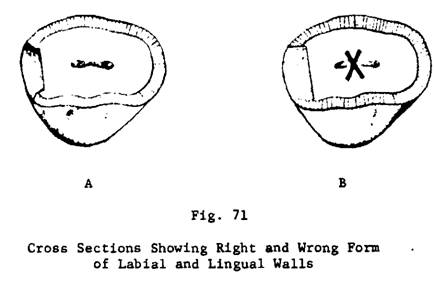
2. To secure resistance form
(Figs. 69, 70, 71A)
a.
Gingival Wall
(1) Flat.
(2) At right angles to long axis of the tooth labio-lingually.
(3) Established so axio-gingival
line angle is just within the dentin (Fig. 70).
b.
Labial and Lingual dentin walls
(1) Slope slightly outward from the axial wall forming
an obtuse angle with it (Figs. 69, 71A).
(2) These angles are formed just within the dentin.
c. Labial and lingual present a definite enamel wall in
a plane different to that of the dentin wall (Figs. 69, 71A).
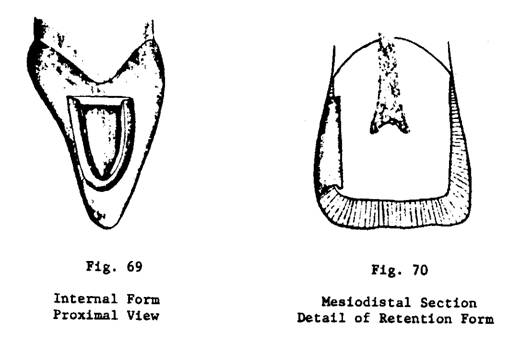
Retention Form
1. Retention form is
established between the gingival and incisal portions
of the cavity (Figs. 65, 69, 70).
2. In
the gingival portion
a. Axio-gingival line angle is acute.
b. Labio-axio-gingival and linguo-axio-gingival
point angles are slightly recessed at the expense of the gingival and of the
labial and lingual respectively, forming definite sharp point angles which are
in effect, convenience points for beginning the foil insertion. (Figs. 65, 69). See "Convenience Form",
3. The incisal
angle presents a definite undercut, principally at the expense of the incisal wall and to a lesser degree at the expense of the
labial wall (Figs. 69, 70). Since this area is cut to provide some bulk of
material rather than a sharp point, it is designated the "incisal angle" rather than to call it the "labio-linguo-axial point angle."
4. The Axial Wall
a. Flat
as a rule.
b.
Just slightly within the dentin.
c. Established parallel with the contour of the tooth, inciso-gingivally and labio-lingually,
and not necessarily with the long axis or with the central labio-lingual
plane of the tooth (Figs. 69, 70, 71).
CONVENIENCE FORM
Convenience form requires
that the cavity be extended sufficiently to permit the introduction of the
instruments necessary for the preparation, and of those necessary for the
placement and condensation of the restorative material with the proper line of
force.
The labio-axio-gingival
and linguo-axio-gingival point angles provide
"convenience points" for starting the foil (Figs. 65, 69).
In some cases, for increased
convenience in initial retention, greater bulk of gold is desired in the usual
gingival "starting points" than is possible with sharp point angles.
This may be accomplished by substituting a small "convenience pit"
for either or both of the point angles at the lingual and labial terminations
of the axio-gingival line angles. The forming of the
pit is the final step of the cavity preparation. The instrument used is a
miniaturized, end-cutting, inverted cone bur; the side of the head is slightly
hollow-ground so the resultant pit will be somewhat undercut; the diameter of
the end of the head may range from 0.40 mm to 0.45 mm. (The diameter of a 33½
inverted cone bur is 1.1 mm). The pit is made no deeper than the length of the
head of the bur (0.5 mm); less depth is usually adequate.
The cavity here outlined
provides the maximum degree of convenience for placing foil, consistent with
the requirement of inconspicuousness, and of minimal sacrifice of tooth
structure.
FINISH OF THE ENAMEL WALLS
1. The enamel walls are
finished smoothly with a freshly sharpened cutting instrument and care is taken
to be sure that all enamel rods are supported by sound dentin.
2. While a definite cavosurface bevel as such is not established, the planing and correcting of the cavosurface
margin to remove loose and fragile enamel rods and to create a continuous
regular margin, will automatically establish, in effect, a cavosurface
bevel.
3. The linguo-gingival
cavosurface margin is finished to a sharp definite
angle (Fig. 68).
4. The labio-gingival
cavosurface margin is rounded very slightly to
relieve any severity in form at this point in the restoration (Fig. 69).
USUAL SEQUENCE OF INSTRUMENTS
Inverted cone bur, 33½, h.p., new
6½-2½-9
hoe
15-15-3 or 11 1/2 - 15 - 3
(medium or narrow) Wedelstaedt chisel, contrabevel
10-4-8
hoe
7-(84)-2½-9, R & L,
(small) angle formers
3-2-28
hatchet
8-1-23
axial wall plane
33S bur (special miniaturized
33½ inverted cone)
CLASS 3 GOLD FOIL RESTORATION
CAVITY PREPARATION
Instruments
Inverted cone bur, #33½, h.p., new
Round bur, ½, h.p., if necessary
Hoe, 6½-2½-9 (A-23*)
Wedelstaedt chisel, medium, 15-15-3 (A-4), or narrow 11 1/2 - 15
- 3 (A-6), contrabevel
Hoe, 10-4-8 (A-21)
Spear point drill, if
necessary
Small angle formers, 7- (84)
- 2 1/2 - 9 (A-38 & 39)
Incisal hatchet, 3-2-28 (A-19)
Axial wall plane, 8-1-23 (A-46)
33S bur
Explorers - right angle
(G-3), and contra-angle (G-2), fine, sharp, single end.
Sequence of Instrumentation
1. Wedelstaedt
chisel, reverse bevel, A-4 (or A-6) or A-23 hoe - to open cavity, if
accessible. (Open from weakened wall.) If inaccessible, use 33½ inverted cone
bur or # 1/2 round bur to remove enough central stock
so instruments may be introduced from labial and lingual. (Protect adjacent
tooth with matrix steel if necessary.)
2. Inverted cone bur - 33½ - h.p., (new) to establish
gingival
wall
labio-gingival angle
linguo-gingival angle and shoulder.
a.
Bur is placed first in center of gingival wall from the labial,
and drawn labially, forming the labio-gingival
angle.
b.
Then introduce the bur from lingual, and draw it lingually,
forming the linguo-gingival angle or shoulder.
Note: Amount of extension of
gingival wall determines the outline form of the cavity. It is the key to the
entire cavity form.
3. Wedelstaedt
chisel, reverse bevel, and A-21 hoe to complete outline form.
4. A-23 hoe
to form
interior of cavity
to remove
stock
to begin
formation of incisal retention area to define line
angles, and
to smooth
gingival and axial walls
5. A-21 hoe to true gingival
wall and confirm adequate labial extension.
6. Spear point drill may be
used to localize and begin formation of gingival point angles.
7. Angle formers, right and
left - (usually small)
to form
gingival point angles
to
establish acute axio-gingival line angle
to rough
out incisal retention.
8. A-19 special hatchet to
complete incisal retention - (at expense of incisal and labial, not cutting axially). Be sure the
cutting edge is parallel to the instrument handle, rather than perpendicular to
the axis of the blade. (It should be sharpened with a long, bi-bevel)
a.
With shaft at right angles to labial surface, use with combination cutting and
lateral scraping motion (giving a square cut retention area). "Cut" incisally, "scrape" axially.
b.
With shaft parallel with long axis, and the acute end of the cutting edge, very
sharp, define the axio-incisal line angle.
9. A-19 hatchet - in cavities
of limited labial extension - to sharpen labio-axio-gingival
point angle.
10. Wedelstaedt
chisel, reverse bevel or A-21 hoe to finish enamel walls to true the cavosurface margins.
11. Wedelstaedt
chisel, regular bevel, or A-21 hoe to finish linguo-gingival
shoulder and cavosurface angle.
12. Angle formers on the incisal and gingival to finish the enamel walls to true the
cavosurface margins.
13. May use A-46 axial plane
- to smooth axial wall.
14. 33S bur - (it is often
modified to suit the case) may be used to provide increased convenience and
retention in gingival point angles. The resultant slightly undercut pit (1/2 -
2/3 the length of the head in depth) is not modified further. This is the final
detail in preparation.
15. G-3 explorer (right
angle) to clean line angles and point angles to test linguo-gingival
point angles.
16. G-2 explorer (contra
angle) to test labio-gingival angle and the incisal retention.
*Instrument numbers refer to University of Washington set.
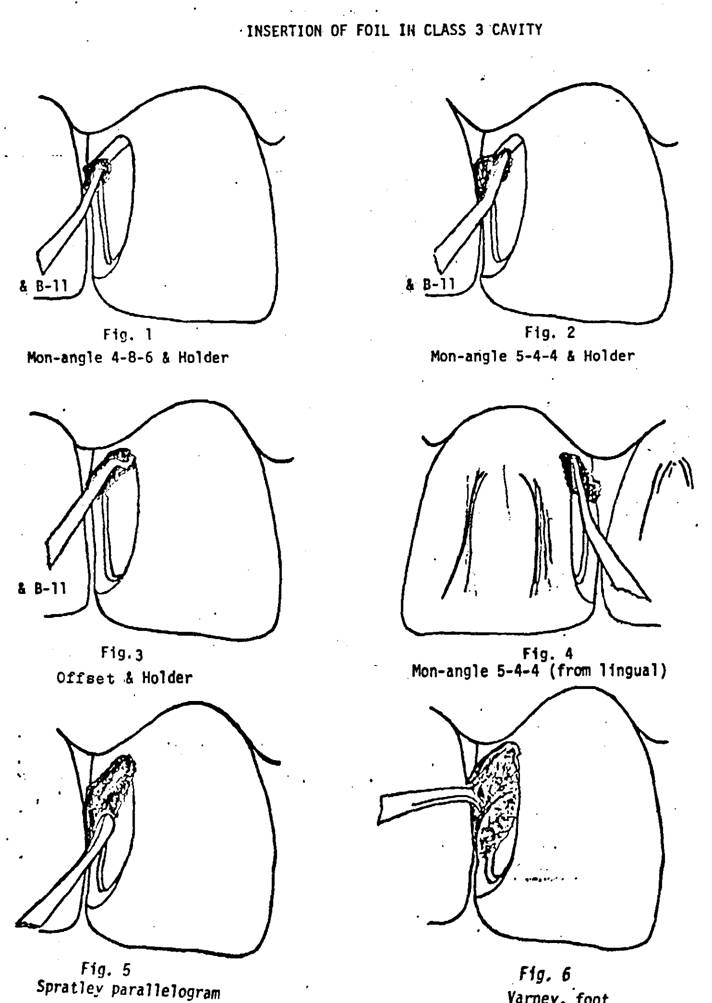
INSERTION OF GOLD
Instruments
Foil mallet - Ferrier
Foil holder - Ferrier and/or
Woodbury (Suter) 23
Foil passer, U.W. B-12
.4 monangle
condenser, Ferrier 7
.5 monangle
condenser, Ferrier 4
Offset condenser, (bayonet)
U.W. B-4, 5 or 6
Oblique-face monangle, B-3S
Foot condenser - Varney 5, or
Ferrier "F"
Right angle condenser,
Ferrier 11
Small parallelogram
condenser, Spratley
Separator, stabilized
Condensers
Number Name Formula
Point Long Handle
B-22 B-2 4/10th
monangle 4-8
-6
23 3 5/10th
monangle 5-4.5-7
23 S 3 S oblique
monangle 5.5-4-6-25
24 or 4 or small
offset, Myers 4.5-1.25-3.5-18-1
25 or 5 or medium
offset, Ferrier 8 5-1.5-3-12-0
26 6 long
offset, Ferrier 9 5-2-3-12-1
27 7 parallelogram 7.5 x 3.5 - 2.5 - 4
28 8 foot,
Varney 5 10 x
7.5-10-13
29 9 foot,
Ferrier F 5-2-18
10 right
angle, hand, Ferrier 11 4.5-1.2-23
11
or holder,
Ferrier 5-8-10
13 holder,
Woodbury 23 (Suter)
12 foil
passer 0-11-10
PROCEDURE
1. Separator may be placed
and stabilized before insertion is commenced, or may be delayed until making
the turn. (see step 9.)
2. Start in linguo-axio-gingival point angle or convenience pit (Fig.1).
.4 monangle and holding
instrument, from labial.
1/64th pellets (may use a 1/128th first).
Compact into angle, from labio-incisal.
3. Cover gingival wall and linguo-gingival shoulder advancing to labio-gingival
angle (Fig.2).
.5 monangle and holding
instrument, from labial.
1/64ths.
Compact
against gingival wall and into axiogingival angle.
Hold into linguo-axio-gingival angle.
4. Labio-axio-gingival
angle (Fig. 3).
Offset
and holding instrument.
1/64ths
Compact into point angle as directly as possible,
holding firmly into linguo-gingival angle, from the
labial.
5. Wedge into labio-gingival and linguo-gingival
.5 monangle.
Force
directed into cavity and against gingival wall.
6. Build up gingival portion.
(Figs. 4 and 5)
.5 monangle or oblique monangle or small parallelogram, chiefly from labial, but
occasionally from lingual. 1/43rds
or 1/64ths, occasionally 1/32nds
Be
sure linquo-gingival is COMPLETELY covered and well
condensed.
Keep
lingual ahead of labial and axial ahead of the external mass.
The
line of force should always be toward the axio-gingival.
7. Confirm compaction of
central portion, during building up of restoration (Fig. 6).
Foot or 3-S oblique-faced monangle,
from labial and from lingual.
Sometimes the "F" foot.
Reach
"toe" of condenser into embrasure as fully as possible.
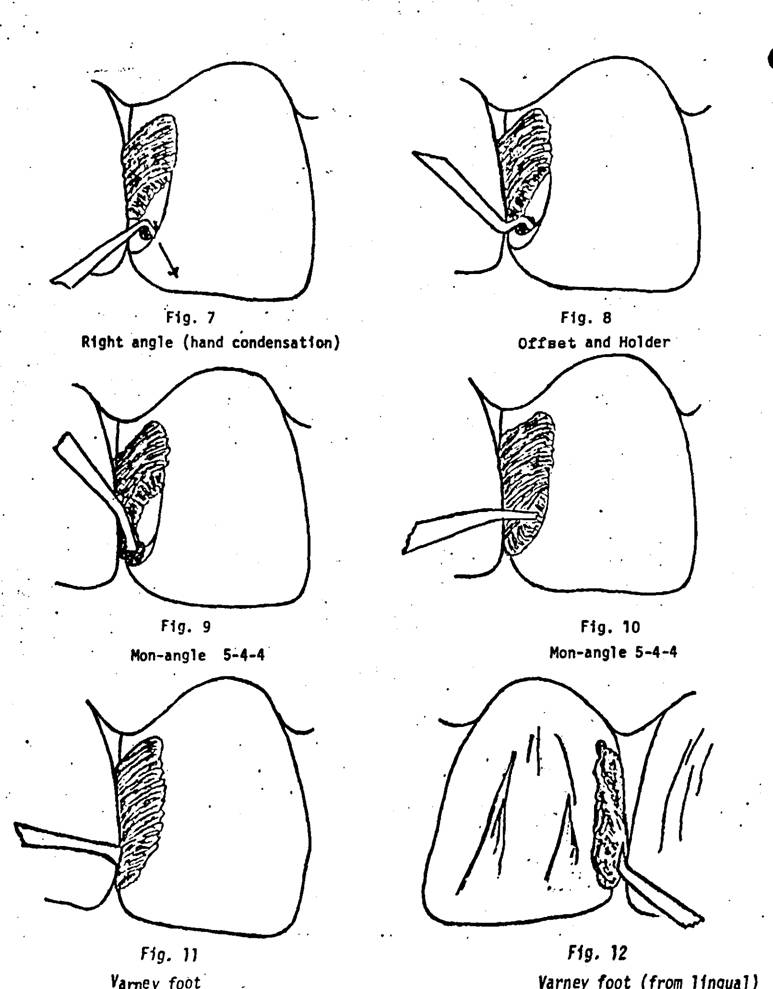
8. Incisal
angle (Figs. 7 and 8).
Right angle hand condenser, followed by a suitable
offset condenser that has been tried in the incisal
angle prior to foil compaction.
1/128ths.
Compact by hand pressure at first.
Permit
portion of pellet to attach to existing mass of foil to stabilize it.
Holding
instrument to stabilize gingival mass; offset condenser from labio-gingival, directly into angle. Compact carefully and
thoroughly.
9. Make the turn (Fig. 9)
Separator
positioned and stabilized with compound.
.5 monangle or oblique monangle
l/64 ths.
Compact against incisal
wall, chiefly from labio-gingival.
Be
sure sufficient foil is forced through to cover linguo-incisal
cavosurface and to provide required contour in this
area.
Some
compaction can be done from lingual, but addition of gold from lingual in this
area is usually unsatisfactory.
10. Complete the contour
(Fig. 10).
.5 monangle or small
parallelogram.
1/64ths or 1/43rds.
Secure
slight excess, but scuff off excess at margins as compaction progresses,
11. "After-compaction"
(Figs. 11 and 12).
Foot or oblique monangle.
Go
over entire surface, to reduce serrations and to detect any incompletely
compacted areas.
12. Burnish to detect any
soft or undercontoured areas. Beavertail burnisher,
FINISHING
Instruments
Ferrier separator #1, 2 or 3,
stabilized
Beavertail burnisher, F-2
Small gold knife, B-51
Gold files, Shooshan, d.e. B-41/42, 44/45
Cleoid-discoid, D-5
Suitable
small, mounted stones, h.p.
Finishing strips, 18', cuttle - x-fine, x-narrow; fine, x-narrow; medium, narrow;
medium, wide
Supplementary -
Fine
steel strip
Sproule
disc mandrel
3/8"
discs - garnet - 4/0
cuttle - 1/0, 2/0 and 3/0
Snap-on
rubber cup, r.a.
303
lap emery 309W final polish
Garnet
strip, 18"- fine,
narrow
1. Increase separation
slightly. Pass steel strip through contact.
2. Reduce excess and develop
contour
sharp
gold knive with light shaving cuts.
Pull-cut file.
Long abrasive finishing strips.
3. Lingual
Cleoid or discoid at lingual margin.
Gold knife, as on labial.
Inverted
cone stone (semi-worn) may be used if concave tooth contour is required, or if
there is excessive bulk to remove (Use extreme care that enamel rods are not
fractured or crushed).
3/8"
discs are useful occasionally.
4. Stripping.
Whenever
stripping is done, the restoration must be kept cool with a constant stream of
cold air.
Occasionally
a fine, steel abrasive strip is necessary to clear the contact area.
Pass extra-fine, extra-narrow cuttle
strip (#1); then fine, extra-narrow strip (#2); then medium grit, narrow width
strip (#3).
Occasionally
medium grit, wide, cuttle strip (#4) is of value to
reduce irregularities in contour.
Occasionally
a fine, narrow, garnet strip (#5) is useful if plus contour is excessive.
Care
must be exercised against excessive stripping, to avoid a minus contour or an
open contact.
5. Contouring is accomplished
by alternating between the knife and file and the strips, with most of the work
being done with the knife, which usually requires resharpening
during the procedure.
6. Ease off separator
gradually and as soon as possible. The separator is usually removed before the
final polishing with the worn out strip.
7. Be
sure that all excess is trimmed off, flush to cavosurface
margins, especially at the gingival margin. Check it with the gold knife.
8. Finishing of the labial,
proximal and lingual is completed by progressing from the coarser to the finer
and still finer strips, until a final satin finish is accomplished with a worn
out extra-fine, extra-narrow cuttle strip.
9. No further polishing is
done on the labial portion. Anything
beyond the satin finish will increase the reflection of light by the gold and
will make the restoration objectionably conspicuous. The lingual portion may be
polished with dry lap emery, followed by dry high polish (309W), on a soft
rubber cup in the contra-angle, if desired.
W. I. FERRIER'S MODIFICATIONS OF BASIC
FERRIER CLASS 3 FOIL PREPARATION
There are five areas in which
Ferrier recommended routine modification from his basic Class 3 preparation:
1. Maxillary lateral incisor,
distal, where disto-incisal angle is strongly
rounded; also the distal of some similarly shaped central incisors
2. Mesial
of some maxillary cuspids
3. Maxillary cuspid, distal surface
4. Mandibular
incisors and mesial of mandibular
cuspid
5. Mandibular
cuspid, distal surface
Distal Surface of Maxillary Lateral Incisor and
Maxillary Central Incisor, with markedly rounded disto-incisal
angle
The change, primarily to
improve esthetics, is the elimination of the usual curved incisal
outline. Thus, the labial and lingual outlines are straight, from the gingival
to the incisal cavo-surface
angle. The resultant preparation avoids what would otherwise be an inharmonious
conflict of opposing curves, one the curve of the angle of the tooth, the other
the incisal form of the preparation. Coincidentally,
but of less importance, it enables a direct line of compacting force from the incisal, and avoids 'making the turn.'
Mesial Surface of Some Maxillary Cuspids
Again the curved incisal outline is eliminated. The labial outline parallels
the labial contour of the approximating lateral incisor. The modification is
partially to improve the esthetic result, but is primarily to enable better
compaction of the foil. In some of these preparations proper access for the
condenser is very difficult. A direct incisal
approach eliminates the problem.
Maxillary Cuspids, Distal
Surface
The reason for the
modification in this location is to improve convenience form and access for the
condensing instruments. Here the modification becomes the typical form.
Again the curved incisal wall is removed. The straight labial outline
parallels the central lobe rather than the distal contour of the tooth. The
lingual outline is usually straight also, but occasionally it may have a slight
curve, to reduce the extent of involvement of the distal slope of the incisal edge. A direct line of compacting force, from over
the marginal ridge of the first bicuspid, is provided. In spite of the improved
access, care is required to obtain a dense, well-compacted linguo-gingival
shoulder. The preparation is box-like in its entirety. Positive, accessible incisal anchorage is established. The gingival wall meets
the axial wall at a somewhat more acute angle than in the basic preparation.
The enamel, at the incisal, is hollowed to provide
greater bulk of gold at the incisal edge.
Mandibular Incisors and Mesial
of Mandibular Cuspid
The routine modification here
is to:
a. Minimize the cutting on
these small teeth
b. Avoid having to compact
gold from the lingual direction
c. Avoid involvement and loss of the incisal angle of the tooth.
These areas are highly immune
to decay usually, so a preparation of very limited extension is possible. A
mechanical separator is routinely placed and stabilized for the entire
operation so that:
a. Extension may be
minimized, yet access will be adequate
b. These thin teeth may be
supported during the preparation and the insertion of the foil.
The modification becomes the
typical form in this location. It consists of strongly restricting the incisal, gingival, and particularly the lingual extensions.
The gingival usually, but not necessarily, is carried under the free gingiva. It is straight from labial to lingual, and is perpendicular
to the vertical plane of the tooth. The incisal
includes the involved area, but may not include any or all of the contact area.
The labial outline is restricted as much as is consistent with required access;
it parallels the contour of the angle of the approximating tooth, and meets the
incisal outline in a pleasing definite curve. The
lingual outline just barely clears the approximating tooth. Such restriction is
possible because of the relatively high immunity to decay in this area. The
internal form of the preparation differs from the basic in being relatively
much smaller and more shallow, and primarily
in having a single-planed lingual wall rather than the
customary two-planed lingual wall. The incisal
retention is definite, but care is taken to not cut it at the expense of the
labial incisal dentin as is done in the maxillary
preparation. For greater convenience, a linguo-axiogingival
convenience pit may be out, using a miniaturized end-cutting inverted cone bur.
Mandibular Cuspid,
Distal Surface
This preparation may take one
of two forms.
If the lesion develops
coincidentally with one in the mesial surface of the
first bicuspid, a typical Class 3 preparation may be cut, while the bicuspid is
open and partially prepared. Aided by mechanical separation, adequate access is
obtained for a very small preparation.
The second form of
preparation is used when the mesial of the bicuspid
is not open or involved. Here, greater access is required, so a proper line of
force may be obtained over the prominent mesiobuccal
angle of the bicuspid. Esthetics is not a restricting factor. The labial is
opened freely. It parallels the central lobe of the cuspid.
The lingual wall is left standing whenever possible, but it clears the bicuspid
somewhat more than in the incisors, for the immunity and access to home
brushing of this area are less than is the case in the incisor region. The incisal outline clears the bicuspid contact and curves
strongly to meet the labial outline. It is not cut away as in the case of the
maxillary cuspid. The gingival is straight labio-lingually; it is carried under the free gingiva, and meets the labial and lingual in a definite
angle. Internally, as usual, retention is between the gingival and the
positive, acute axio-incisal angle. The gingival
wall, as in the basic preparation, is single-planed, and meets the axial wall
in a definite acute angle. The entire preparation is box-like. The labial wall
is two-planed as usual. The lingual wall is cut in a single plane from axial to
cavosurface, similar to that in the mandibular incisor. A separator is placed as usual for the
insertion of the foil. Compaction is entirely from the labial, except in the
case of replacing a restoration in a preparation that destroyed part of the
lingual wall.
References
Ferrier,
W.I.
1. Treatment of proximal
cavities in the anterior teeth with gold foil. JADA 21:571-583, April 1934
2. Treatment of cavities in
the anterior teeth and pit and fissure cavities in the posterior teeth with
gold foil. JADA 23:355-371, March 1936
3. Use of gold foil in
general practice. JADA 28:691-700, May 1941
4. Gold foil operations. University of Washington Press, 1959, pp.77-84.
CLASS III GOLD FOIL RESTORATION LINGUAL
APPROACH
Indications
a. Carious lesions with
minimum facial extension - less than 1 mm.
b. Replacement of failing
restorations with minimum facial extension.
c. Limited mainly to maxillary teeth.
Instruments
Cavity Preparation
Burs
½ round, tungsten-carbide (for high-speed contra-angle)
700
tapered fissure, tungsten-carbide (for slow-speed contra-angle)
33½
inverted cone (for straight handpiece and for
slow-speed contra-angle)
56
plain fissure (for slow-speed contra-angle)
335
inverted cone (for straight handpiece)
Chisels
Wedelstaedt
Jeffery
11 (10-3-5)
Hoes
No.
100 (7-2½-23) A-25
(4½-l½-25)
Angle Formers
A-38-39
(7-84-2½-9)
Offset
60-80 (7-80-0-1) or Jeffery 8-9 (6-80-2-2)
Hatchet
Jeffery
10 (3-2-32)
Insertion
Separator
- Ferrier 1 or 2
Foil
passer B-12
Mallet
- automatic
Condensers
Monangle B-2 or B-22 B-3 or B-23 B-3s or B-23s
Lingual
Approach
Offset B-4
Foot B-9
Contra-angle - Jeffery 21 Back-action
Carving
instrument - D-3 or D-4
Finishing
Files B 41-42 & B 44-45
Gold knife B-51
Steel matrix material
Abrasive point F-2 (for
straight handpiece)
Cleoid-Discoid D-5
Sproule mandrel (for straight handpiece)
Burnishers F-2 & F-3
Extra long finishing strips -
cuttle
Medium Wide and Narrow
Fine Extra Narrow
Extra
Fine Extra Narrow
Cuttle-discs - 3/8 inch Medium 00 Fine 000
Cavity Preparation
1. Open from lingual with a ½
round carbide bur in high-speed contra-angle.
2. Extend lingual outline
with a 700 carbide bur in slow-speed contra-angle.
3. Remove bulk with a 33½ bur
in slow-speed contra-angle.
4. Establish facial wall with
the end of a 33½ bur in slow-speed contra-angle.
5. Establish incisal wall with the side of 33½ bur
in the straight handpiece.
6. Establish gingival wall
with the end of a 33½ bur in the straight handpiece.
7. Complete lingual outline
with a Wedelstaedt chisel.
8. Establish lingual wall
with the side of a 33½ bur in the slow-speed contra-angle.
9. Plane gingival wall and
gingival third of facial wall with the chisel end of cutting instrument 100.
10. Plane the remainder of
the facial wall and the incisal wall with the hoe end
of cutting instrument 100.
11. Plane the lingual wall
with the hoe end of a 100 or with an A-25.
12. Make gingivo-axial
angle acute with bayonet angle former.
13. Establish an acute linguo-gingivo-axial angle with the offset angle former.
14. Establish an acute facio-gingivo-axial angle with the angle former A38-39.
15. Establish incisal retention with the Jeffery hatchet 3-2-32.
16. Place convenience pits in
the facio-gingival and the linguo-gingival
with a 33S bur in the straight handpiece.
17. Refine the lingual
outline with a Wedelstaedt chisel and a No. 56 plain
fissure bur in the slow-speed contra-angle.
Insertion of Gold Foil
1. Place separator
2. Begin by condensing a
1/128 or 1/64 pellet into the facio-gingival
convenience pit.
3. Fill the facio-axio-gingival retention. Use a B-2.
4. Build a bar across the
gingival to the lingual. Use a B-2.
5. Fill the linguo-axio-gingival angle with 1/128 pellets with the
offset condenser. Use a B-4.
6. Cover the entire gingival
wall including the cavo-surface margin. Use a B-3.
7. Obtain slight separation.
8. Build up the restoration
with the monangle condensers B-3 and B-3S, keeping
the facial ahead of the lingual. Use B-3S along the facial cavo-surface
margin.
9. Place two 1/128 pellets
with hand pressure into the incisal retention. Use
the contra-angle condenser, Jeffery No. 21. Then condense with the back-action
condensing point No. 5 in the automatic condenser.
10. Complete the insertion of
the foil on the lingual with the B-3 condenser and the back-action condenser.
Use the back-action condenser, if necessary, for the incisal
wall.
11. Condense any surplus gold
appearing on the labial with a monangle or a foot
condenser of suitable size. B-2, B-3 or B-9. Support
the restoration with an instrument on the lingual while condensing from the
facial.
12. Add gold on the facial,
if necessary.
13. Burnish the facial gold
with a carving instrument, D-3 or D-4.
14. Burnish the lingual gold
with a burnisher F-2.
Finishing
1. Increase separation
slightly.
2. Enlarge facial and lingual
embrasures with a gold knife, B-51.
3. Slide a length of matrix
metal, 5 cm, through the contact area.
4. Pass an extra-fine
extra-narrow cuttle strip through the contact area
several times.
5. Repeat with a fine
extra-narrow strip.
6. Repeat with a medium wide
strip.
7. Use files, where possible,
to reduce the bulk of gold over the margins.
8. Reduce surplus on the
lingual contour with an abrasive point F-2 in the straight handpiece
and with a cleoid.
9. Reduce surplus proximal
contour with a gold knife B-51 and medium narrow cuttle
strips.
10. Finish with cuttle strips, fine narrow, and
extra-fine extra-narrow.
11. Remove separator.
12. If necessary, disc
lingual with medium and fine 3/8 inch cuttle discs in
the Sproule mandrel.
13. Polish with dry 303 and
309W in a soft rubber cup in the slow-speed contra-angle.
CLASS III FOIL — LOWER LATERAL -MESIAL
Class III cavity prepared in
lower right lateral incisor, mesial surface, for the
reception of gold foil as the restorative material.
General Considerations
1. The lower class III
preparation differs from the typical upper proximal foil preparation. Proximal
surface caries occurs least frequently in the lower incisors.
2. The relative immunity of
these surfaces and the fact that these teeth are small and delicate permit very
conservative cavity preparations.
3. The incisal
angle must be safeguarded above all else for it is most difficult to restore
esthetically.
4. The principal
modifications from the basic preparation are
a.
The lingual wall is left standing to preserve the strength of the incisal angle.
b.
The incisal outline may be restricted, and not
include the complete area of contact.
c. The
lingual outline clears the approximating tooth only enough to permit proper
finishing of that margin of the restoration.
d. Routinely, a mechanical
separator is placed for the complete operation to permit maximum conservation
in the preparation and to support these small teeth throughout the procedure.
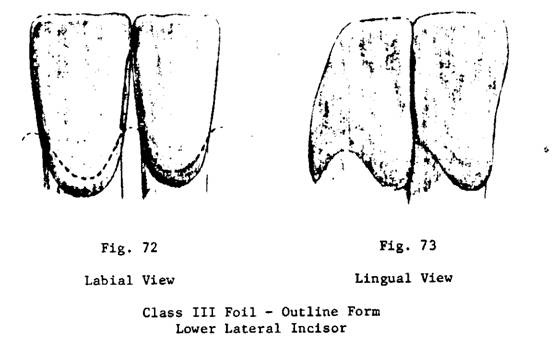
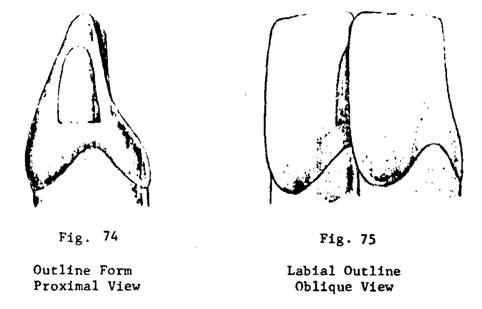
Outline Form
(Figs. 72-75)
1. Considerations
a.
Maximum conservation of tooth structure, especially incisal
angle.
b.
Esthetics.
c.
Relative immunity of these surfaces to decay permits compromise with the
general rule of extending to an area that is readily cleansable.
2. Gingival Outline (Fig. 74)
a.
Placed uniformly beneath level of the normal gingival tissue.
b.
Approximately perpendicular to long axis of tooth.
c.
Straight labio-lingually.
d.
Meets lingual and labial at a definite angle.
3. Labial Outline (Figs.
72-75)
a.
Similar to labial outline for upper incisor, but much more restricted.
b.
Gingival three-fourths parallels corresponding marginal ridge of the tooth
generally, yet conforms with the contour of the labial
surface of the approximating tooth.
c. Incisal one-fourth is a curve which blends gracefully into
this line and into the incisal outline.
d. Meets
gingival at a definite angle.
4. Lingual Outline (Figs. 73,
74)
a.
Parallels and barely clears the contour of the approximating tooth.
b. Meets
gingival at a sharp angle.
c. blends smoothly into the curved incisal
outline.
5. Incisal
Outline (Figs. 72, 74)
a.
Curved to blend into labial and lingual outlines.
b.
Includes contact area if possible without endangering incisal
angle of tooth. If the contact area extends to the incisal
edge, the high immunity to decay of these teeth, justifies restriction of the
outline, rather than involving the very difficult restoration of the incisal angle.
c. May
not include full incisal extent of the contact area.
d. Is
restricted in incisal extent so
(1) Incisal angle of tooth
will not be endangered.
(2) Proper internal incisal
form may be obtained, and yet preserve adequate dentin support for the incisal enamel.
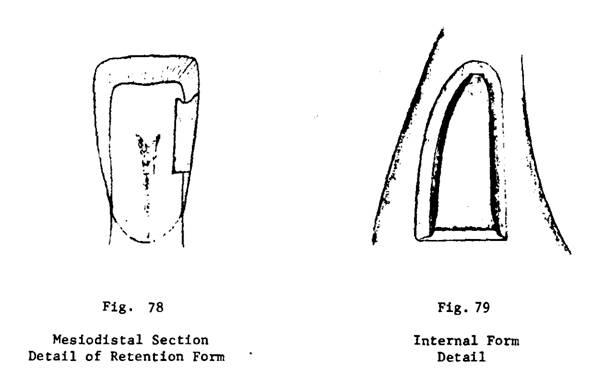
Resistance and Retention Form
1. Resistance form is
required to meet forces applied during insertion and compaction of the foil.
2. Retention form is
established between the gingival and incisal portions
of the preparation (Fig. 78).
3. Gingival Wall (Figs. 76,
78, 79)
a.
Flat and straight.
b.
Slopes gingivally to meet axial just within dentin at
slightly acute angle.
c. Meets
labial and lingual walls at sharp definite angle.
4. Labial Wall (Figs. 76, 77,
79)
a.
Is in two planes, - enamel wall and dentin wall.
b.
Dentin wall meets axial just within dentin in a definite, slightly obtuse
angle.
c. Is of uniform labio-lingual
thickness from gingival to incisal.
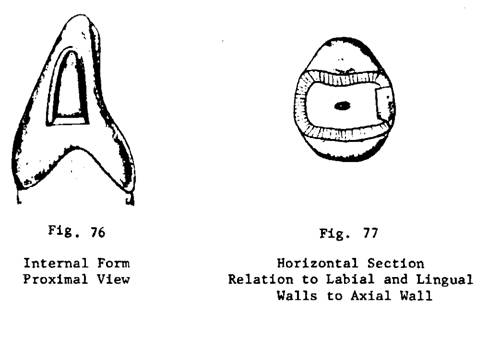
5. Lingual Wall (Figs. 76,
77, 79)
a.
Is in single plane.
b. Meets
axial at right angle.
6. Incisal
Wall (Figs. 76, 78, 79)
a.
Is in two planes.
b.
Line angle of enamel and dentin planes of wall fades out into the single-plane
lingual wall.
c.
Dentinal portion is definitely retentive and meets axial at acute angle.
d. Incisal retention should provide bulk of foil without
weakening incisal enamel. It is cut incisally only. Attrition wears the labial and incisal surfaces of lower anteriors,
so the incisal undercutting cannot be inclined to the
labio-incisal as in upper incisors.
7. Axial Wall (Figs. 76-79)
a.
Flat and smooth.
b.
Uniformly deep.
c. Just
within dentin.
d.
Meets each peripheral wall at definite angle.
8. Gingival Point Angles
(Fig. 79)
a. Labio-axiogingival and linguo-axio-gingival
point angles are sharp, cleancut, acute.
b. Cut more at expense of
labial and lingual respectively, rather than gingival or axial.
Convenience Form
1. Requirements are for
instrumentation access for the preparation and for the foil insertion and
compaction.
2. A very small linguo-gingival pit may be used to enable more bulk of foil
in the linguo-axio-gingival point angle area.
3. All instrumentation is
from the labial. Normally none is done from a lingual approach.
4. The teeth are separated
mechanically throughout the complete operation to
a.
Minimize cutting of labial tooth structure for access.
b.
Stabilize these slender-rooted teeth.
c.
Distribute the operative forces, rather than confine them to the tooth being
restored.
Finish of the Enamel Walls
1. The enamel walls are
planed smooth with a freshly sharpened cutting instrument. Care is taken to
insure dentin support for all enamel rods.
2. There is no cavosurface bevel beyond that which is established
coincidentally with the planing and truing of the cavosurface margin to remove loose or fragile enamel rods
and to create a continuous regular margin.
3. The labio-gingival
cavosurface angle is rounded very slightly to relieve
any severity in form at this point in the restoration.
The above lists,
instructional materials & recommended readings have been prepared by Dr
Gerald D Stibbs and the members of the George Ellsperman Gold Foil Seminar. They have been used be the George Ellsperman Gold Foil Seminar for our instructional manual
and course materials over the years.
Some modifications have been made from the original list by the members
of the GEGFS, but they are largely the work of Dr Gerald D Stibbs.
The Digital
edition has been the work of the George Ellsperman
Gold Foil Seminar under the direction of Dr. Bruce B Smith.