PREPARATION OF GOLD FOIL
Purpose: To prepare gold foil in usable form,
quickly and with the least amount of handling.
Materials: Book of #4 noncohesive gold foil
Pellet and cylinder guide
Foil pliers
Cylinder fork (wool darner, 4/0)
Foil cylinder knife
Gold foil scissors (
Clean towels (2)
Paper clips (2)
Pencil
Ruler
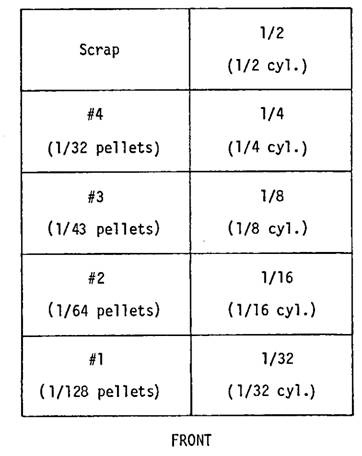
Gold box
Ammonia 28 %
Procedure: Preparatory
1. Wash and dry hands thoroughly.
2. Spread out a clean towel.
3. Using the pellet or cylinder guide, as the case may
be, rule the book of foil for the required size of pellet or cylinder, being
sure to leave a 1/8" border on each side and end of book.
4. Place paper clips on either side of book above ruled
line, to hold the foil in place while cutting.
5. Hold the book firmly between fingers while cutting to
prevent the foil leaves from buckling. So the gold will not be exposed to dust,
do not cut too many sections at once. Cut the gold on to the towel. Remove the
interposed layers of paper.
6. If there is an interruption during the rolling of
gold, be sure to cover the gold and close the gold box. An accident may befall
the gold, or dust or moisture settling on its surface will contaminate the
foil. Contaminated foil is useless.
7. Keep an adequate supply of each size of pellet and
cylinder on hand. Keep a reserve supply of each size in separate bottles.
8. Keep instruments issued for gold foil specifically for
that purpose only.
Pellets
1. With foil pliers, pick up a piece of gold at its
center, and place it between the thumb and first two fingers of the other hand.
2. Then holding the gold loosely with the fingers, turn
in the corners with the pliers, thereby concealing all edges.
3. Gently roll the gold into a loose round pellet.
4. Place the pellet into its correct section of the gold
box or in the reserve bottle.
Cylinders
1. Fold a second towel three or four times to form a
thick pad.
2. Using the pliers, place a strip of gold on the pad.
3. With the knife, crease and fold gold lengthwise, a
shade less than half. Avoid creasing the foil with too much pressure which
would work-harden the gold.
4. Depending on the size of sheet of gold being rolled,
fold the gold into halves or thirds, the raw edge first. Repeat until a ribbon
of required width is produced. This forms a narrow strip of gold with
smooth, folded sides.
5. With pliers place the strip on the heel of the left
thumb and hold the end lightly with the left forefinger.
6. Engage the loose end with the cylinder fork and roll
the foil, forming the gold into a cylinder. Do not roll gold in the palm of the
hand. This area is more subject to perspiration which contaminates the foil.
7. Slide the cylinder off the fork with the thumb and
forefinger.
8. To prevent the cylinder from unrolling, gently pinch
the ends with the pliers.
9. Place the cylinder in its correct section in the gold
box.
10. Cylinders are used in lesser quantities than pellets, consequently a smaller supply will suffice.
11. Size of cylinders
a. The number of folds in a cylinder will
vary with the size of cylinder, and with the length desired in any specific
case. Foil for a 1/2 will be folded over on itself or halved about 4 times; a
1/16 will usually be halved once, then folded into thirds for proper length of
the finished cylinder. A 1/16th to be used to line the wall of a Class 5 cavity
will be folded more, and, therefore, be shorter, than will a 1/16 needed for
the proximal surface of a Class 2. In each case, manage the folding so that in
the finished cylinder the original edge of the gold is not exposed.
b. The diameter of the core of the rolled
cylinder will vary with the type of cavity in which it will be used. One to be
used in a Class 2, will be rolled on a smaller
cylinder form so as to have a minimal hole through the center. One to be used
on the wall of a Class 5 cavity will be flattened out in placing and only by
having a large core can this be accomplished and have a uniform bulk of gold
along the entire wall.